
An In-Depth Step-by-Step Guide to Installing Tile for the Very
-
Posted by Moorsel Bas - Filed in Arts & Culture - 566 views
The current configuration of this bathroom does not lend itself very well to an experience that is calming in any way. Be sure to cut it so that it fits the decoration, and then stick it on the wall, so that you won't rip any wallpaper off in the process. This will prevent you from having to replace the wallpaper. I am able to use a swinging tool and a crowbar because of the environment that I am in. This enables me to rip off all of the plywood that is connected to a quarter of an inch, which paves the way for the surface to be easily paveable. Even though the shape of the floor is quite good, you should continue to check the surface of the floor to ensure that there is not a significant bump in the surface. This is something that you should do even if the floor's shape is quite good. If you have a ridge that is significantly larger than this one, you need to make sure that you use a belt sander to eliminate it by first smoothing it out and then getting rid of it completely. If you have a ridge that is significantly smaller than this one, you can get rid of it by following the instructions in the previous sentence.
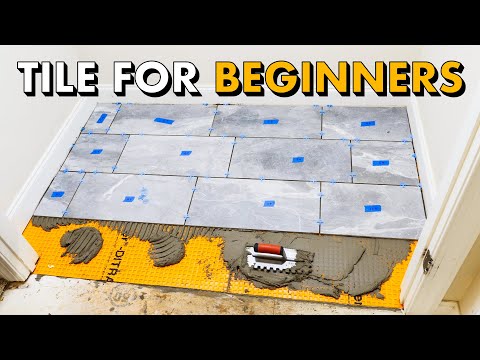
At this point, we are ready to begin laying the base layer that will serve as the foundation for the tiling that will come after it. This will be the first step in the process. I have heard more than one person say that they bypassed that step and went straight to OSB rather than doing what the other person was recommending that they should do. There is absolutely no way that I am implying that you will not be able to get the full service life out of the tiles. Because Schluter and it are so different from one another, ceramic tiles manufacturers I combine them in a very watered-down form in my work. It is imperative that you consult the ditra manual in order to determine the kind of mortar to apply underneath the ditra flooring if you use products that are manufactured by Schluter. This information can be found in the manual. On the concrete slab, I consider Ditra to be a miraculous product due to its low weight, exceptional ease of cutting, and complete absence of dust. These characteristics make it exceptionally simple to work with. It is necessary to install a component known as Kerdi at the joint in order to make the flooring entirely waterproof along its length. This is required in order to make the flooring completely water resistant. This is done so that there will be no interruptions in the flooring installation process. The following is an explanation of what my duties are at this location:

It is finally time to make the floor, which indicates that there is a lot of plaster dust, debris, and other things here, and that we need to begin cleaning very thoroughly in order to get ready for the floor to be made. We will need to perform thirty or thirty-three offsets in order to correctly lay the tiles, despite the fact that there are some recommendations regarding the manner in which to lay the tiles. From these offsets, we will keep one-third, two-thirds, and the rest of the ceramic tiles. At the one-third mark of that section is where I'm going to start providing my commentary. As the third section is completely open-ended, you can begin at any point throughout the entirety of the section. I have made the decision to begin my work from a specific region within that region because doing so enables me to easily sidestep the nozzle of the toilet. Because of this, I have chosen to begin my work from this particular region.
This is a piece of cardboard that was cut off of the mixing valve, and despite the fact that it was not originally intended for this purpose, it serves this purpose extremely well despite the fact that it was cut off. Because of this, we will have some room to move around, which will allow us the freedom to freely swing our arms. To say that the information that my carbide hole cutting saw may have only suffered a partial break is disheartening would be an understatement. If I'm being completely honest with you, I guess you could call me a bit of a square.
The radius that needs to be cut into the wall tiles china in order to achieve the desired result of a round hole is visible on the surface of the tiles, but it is not visible below the surface of the tiles. We use Schluter. During this stage, the entire fifty pound bag is going to be incorporated into the mixture. I'm going to make another one right now by first copying and then making another version of this one. In this scenario, making use of a ruler to draw a line is something that can be done. Put it in this spot so that it is easier for me to bring it to the place where I am working.
The answer that you are looking for is 39 and 3/4, which can also be written as 39 and 3/4. Before you begin laying the tiles, you are going to want to give the area one last wipe down with a wet sponge to ensure that any foreign material has been removed. This should be done so that you can begin laying the china tiles without any problems. This is the square notch trowel that I own, and it has a measurement of a quarter of an inch.
At this point, the tiles have actually undergone a sinking that cannot be undone. This is a permanent condition. I am able to ensure that the first row of that I am laying in this room are being laid in a manner that is both neat and square by making use of the line that we drew earlier on in the process. I am able to do this by utilizing the line that we drew. Both the wall that you are currently cleaning and the ceramic tiles that are on the wall can be cleaned with this sponge. You can also use it to clean the wall itself. The tools that were utilized for the cleanup are going to end up being of great assistance at some point in the not too distant future. In addition to setting up a line here, I also have a laser in this location. After this point, I will be able to place my next complete piece in the opposite direction, and after that, we will be able to cut the pieces on both sides of the board. Afterwards, we will be able to cut the pieces. After that, you will be able to see that I stuffed the ditra with the mortar that had been left out from the work that was done the previous evening.